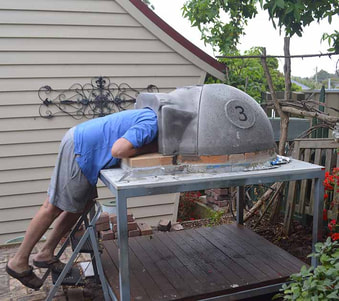
 Matt in the throes of making the pizza oven.
 By Liane Arno
IT’S the time of year when the weather sees us all outside as we regenerate. We have taken advantage of the discounted ham after Christmas and our gardens are bursting with ripe, luscious tomatoes. What better time to make pizzas?
We indulged in buying a wood fired oven kit a couple of years ago that we managed to put together without it affecting our marriage! It was actually quite easy to do so.
It’s taken some time but I think I’ve found the best pizza dough. Of course it’s best cooked in a wood fired oven – but also works in your own home oven. Note, though, that we are making a dough here that is plump. I know you think the best pizzas are skinny – because then you are making a pizza in spite of the base. This dough produces a base that puffs up around all the yummy toppings you choose and has a soft, steamy centre just like fresh bread. Trust me – try it and you won’t go back.

Prepare your yeast by boiling some water. Add about 150ml of it to
While that is happening, pour 150ml of room temperature water into another measuring jug and add
When your yeast is a frothy mass, pour it onto the flour and salt, then pour on the water and oil. Mix with a spoon to combine. I have a mixer with a dough hook so it’s easy to let that churn away at the lowest speed for 10 minutes. If you want to do it by hand, knead until it’s shiny and elastic. There is a test if you want to go a step further called the window pane test. Take a little bit of dough and stretch it into a square until it becomes a thin film in the middle without breaking it. You should be able to hold the dough up and see the light through it.
Pop the dough into an oiled mixing bowl in a nice warm place to let it rise. I spray the top with an olive oil spray and loosely place a piece of cling film on the top of the dough to stop it from drying out before putting a tea towel on the top of the bowl. I have found in summer the window sill is great – but in winter I pop it in the car which warms up nicely. It will take a couple of hours or so.
Then comes the fun bit when you knock down the dough and punch the air out of it. I tend to let it rise again – but you don’t have to. Either way now divide the dough into 200 gram pieces (you will get 8 pizzas) and form the dough into balls. If you aren’t using it straight away spray with a little oil and cover with cling film to stop the balls drying out. They will be fine in the fridge. If you leave them out they will rise again. If you have left them in the fridge bring them out half an hour or so before you want to use them.
Now you are ready to roll them out. You will find they spring back a fair bit, so you won’t be able to get them super thin – but then you don’t want them to be. If they are too thick, you can pick them up and hold an edge and let the weight of the dough stretch them a little thinner.
You don’t need to bother with a pizza tray with a wood fired oven – but if you are using a conventional oven I really like the pizza trays with holes in them which seem to cook much better.
- 1 tablespoon of brown sugar (you can use white sugar of course)
- 1 packet of yeast and bread improver (you can use 7g of normal dried yeast if you want – but it is worth while trying this option) and stir it into the water
While that is happening, pour 150ml of room temperature water into another measuring jug and add
- 4 tablespoons of olive oil (here is where we get to plug our Wonny Olives to Oil where you can make your own olive oil for free!)
- 1 kg flour (this should be bakers’ flour which you can get from any supermarket. It is called ‘00’ or strong white and has a high gluten content. If you are using the bread improver then theory has it you don’t need to have a strong flour – but as it will only cost you an extra $1 per kilo give it a go)
- 10 g of salt (please bury this into the flour so that it doesn’t come into immediate contact with the frothy yeast when you add it as it can top the dough from rising.
When your yeast is a frothy mass, pour it onto the flour and salt, then pour on the water and oil. Mix with a spoon to combine. I have a mixer with a dough hook so it’s easy to let that churn away at the lowest speed for 10 minutes. If you want to do it by hand, knead until it’s shiny and elastic. There is a test if you want to go a step further called the window pane test. Take a little bit of dough and stretch it into a square until it becomes a thin film in the middle without breaking it. You should be able to hold the dough up and see the light through it.
Pop the dough into an oiled mixing bowl in a nice warm place to let it rise. I spray the top with an olive oil spray and loosely place a piece of cling film on the top of the dough to stop it from drying out before putting a tea towel on the top of the bowl. I have found in summer the window sill is great – but in winter I pop it in the car which warms up nicely. It will take a couple of hours or so.
Then comes the fun bit when you knock down the dough and punch the air out of it. I tend to let it rise again – but you don’t have to. Either way now divide the dough into 200 gram pieces (you will get 8 pizzas) and form the dough into balls. If you aren’t using it straight away spray with a little oil and cover with cling film to stop the balls drying out. They will be fine in the fridge. If you leave them out they will rise again. If you have left them in the fridge bring them out half an hour or so before you want to use them.
Now you are ready to roll them out. You will find they spring back a fair bit, so you won’t be able to get them super thin – but then you don’t want them to be. If they are too thick, you can pick them up and hold an edge and let the weight of the dough stretch them a little thinner.
You don’t need to bother with a pizza tray with a wood fired oven – but if you are using a conventional oven I really like the pizza trays with holes in them which seem to cook much better.
Now it is time to cover with your luscious tomatoes and whatever else you have around.
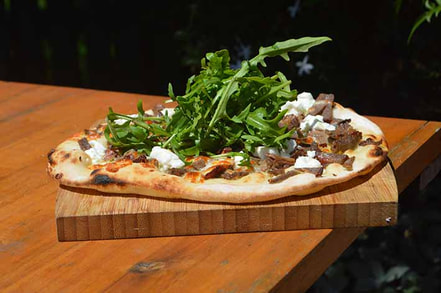
 Lamb pizza
 We often have neighbours around and there are lots of experiments. Jo came up with one that had a drizzle of olive oil, then sprinkled with lamb, some garlic and feta and better yet with a handful of rocket after the pizza is cooked.
Or you could try a Peking duck variety with a base of hoisin sauce, some duck (or chicken or left over Christmas turkey!), shaved shallots (or onion) and then some cucumber after the pizza is cooked.
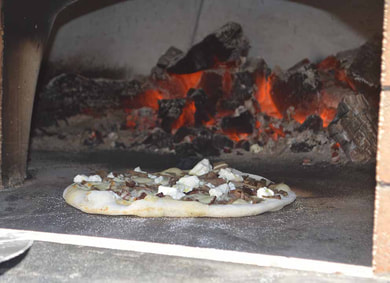
We cook in the wood fired oven at 450°C which you won’t get in a conventional oven – so just put it up to the highest setting you can get – ours gets to 250°C and takes about ten minutes. But keep an eye out as you don’t want a burnt base!
I came across this the other day – what kind of person doesn’t like pizza? A weirdough!!